Friday 13 January 2012

Art quilts - Iris

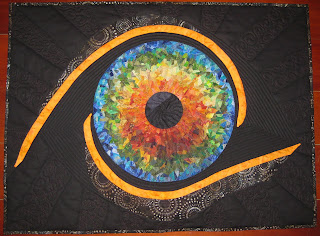
This is my first Art piece for 2012. My holiday project which didn't take very long.  Throughout this blog I will give you a tour on the various stages of this quilt's construction.  Enjoy.


The outline of the Iris and pupil is drawn with a chalk pencil.  The Iris is made up of small snippets of fabric - mixture of cotton and silks.  Each piece is glued with PVA to secure into place. The silk pieces must be covered completely with glue otherwise the silk colour will distort when dry giving a "wet" appearance.


Ive added additional chalk lines to use a guide for addition of other fabric colourways.


 I always have my colour range of fabric pieces close at hand.  The big thing is to make sure glue is not spilt onto the background fabric.

I take progress photos on my phone / camera so I can view my piece from a distance.  This is important as sometimes you don't pick up a mistake when working close up to your piece.


 The pupil is fused using fusable webbing. By cutting the circle exactly the same size ensures there is no overhang.  Overhangs will create a ridge which will be very noticable.


 I have hand appliqued the eye surround.  Getting the colour right was important.  I wanted to use a bright colour but it couldn't clash with the Iris.


 The shadow of the eye surround has been fused on and secured with machine stitching.  This wasn't in my orginal plan but I felt that the eye surround needed something else.


To create a shadow effect on the Iris, I have layered a shaped piece of black chiffon over the Iris and pupil then added a lighter piece of purple chiffon to the pupil to create a light effect.  
To secure the rest of the Iris I have layered a large piece of black chiffon over the top and then stitched it to the outside of the Iris to secure it.  Trimmed the excess.


The top is now layered onto batting and backing fabric to begin quilting.  I have used various colours of thread to enhance the Iris colours.  

I never plan my quilting in advance therefore I never know what the final appearance will be until I have quilted the different areas of the quilt. 
Completed piece.

I will be designing a course later this year using the various techniques used in this blog so start collecting all your tiny scraps - nothing is to small.  Grab off cuts from your friends when they are trimming their blocks.  Separate them into colour bags.  This will become your colour pallet.
Its loads of fun and can be made by any level of quilting experience.

Shirls
Wednesday 11 January 2012

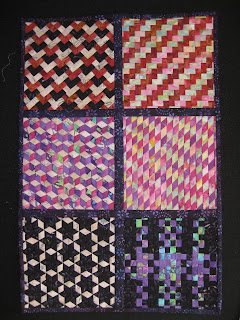
Japanese Meshwork

Meshwork is the Japanese art of weaving bias strips.  Below are some of my samples where I have incorporated meshwork into my quilts.  It adds interested to your work.


Below:  Class sampler showing two and three colour weaves.
Shirls

Kaleidoscope Quilts

Making a kaleidoscope quilt is like going on a big adventure.  You have an idea of where you are going but you have no idea of what will happen and what you will see.  Each block becomes exciting as it is unique to all the others.  I've heard sounds of glee coming from my students.

As you look through this posting you will see the orginal fabric, final quilt and close up views.

It is important to use a good quality fabric where the repeat patterns are exact.  In this first quilt the fabric is of a poor quality, the repeat patterns were off set therefore off setting the centre spinning of each block.


Japanese fabrics are wonderful to use for this technique.


Top before quilting
I bought "One Block Wonder" to learn how to make the
two dimensional blocks in the centre.  Didn't enjoy making those.


I was busy making the Iris so I had this quilt quilted by Sue Bs quilting service.  www.suebsquilting.co.nz

 
There was not enough variation in the fabric used for this quilt so when I put the blocks together it just looked awful.  The blocks appeared to be "fighting" one another for attention.
The quilt was saved by including the brown fabric thus separating the blocks from each other.


The final appearance of each of these quilts was unpredictable.  That's what makes this technique a great adventure.  You must try it.

Shirls

Tuesday 10 January 2012

Art Quilt - Essentially Jesus

This quilt was made from a scene in the "Passion of Christ".  Pictures below show the various stages of construction.


Sky has been painted with fabric paint, then once dry quilted (3 layers of fabric)

 Cross has been felted.  Buttons (nails) have been sanded and painted.

 Fabric was painted for the body and backed with a fine layer of felt. This enables the stitching (cuts)  to give a dent impression. Hair and beard have been felted onto the body.
 Thorns have been constructed using wash away.  This picture shows it pinned out to dry.
 The cross and body have been appliqued to background using both machine and hand applique.  Cuts have been accentuated by "dry" brushing fabric paint onto the wounds.  Contours of the face have been formed by pulling stitches through to the back of the face.  Similar technique used when making a dolls face.
 Final piece (below). 
The bible verse I have associated with this piece comes from 1 Peter 2:24 – the last line “By his wounds we are healed”.


shirls

Art Quilts - Fabulous Flowers

Fab flower1 (left) designed from photograph by Delma O'Conner (below).  Three layers of fabric heavily quilted / stitched with variations of grey threads.  Flower is fused first then stitched over.  Final size of piece is approx A4
Photograph by Delma O'Conner (2010)


Close up to Fab flower1 - shows stitch detail.


 Fab Flower2 (left) designed from photograph by Delma O'Conner (below) 

Same size & manner of construction as Fab flower1 however I chickened out trying to replicate the rain drops.  I did try lots of various methods and substances but because this piece has a fine chiffon mesh over the top the substances I tried would not sit on the surface.


Photograph by Delma O'Conner (2010)


Replications of these photographs were made with Delma's permission.

Shirls

Art Quilts - Petone Beach


From a photograph I took of a mussel shell at Petone Beach in Wellington.  Background is heavily quilted upholstory fabric.  Shell and drift wood have been felted.


Close up of shell.  Shadow effect has been made by felting chiffon fabric into background quilt.


Shirls

Art Quilts - The Shed


"The Shed". Own design - made in 2010 for City & Guilds.  Three layers of fabric heavily stitched then moulded into corrugated shape using water/pva mix.  Once dry, fabric kept its form.  Clock mechanism inserted into the centre of the spiders web.  Spider's web made using wash-away fabric.

Shirls