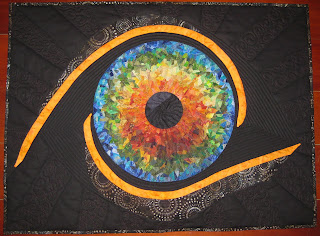
The outline of the Iris and pupil is drawn with a chalk pencil. The Iris is made up of small snippets of fabric - mixture of cotton and silks. Each piece is glued with PVA to secure into place. The silk pieces must be covered completely with glue otherwise the silk colour will distort when dry giving a "wet" appearance.
Ive added additional chalk lines to use a guide for addition of other fabric colourways.
I always have my colour range of fabric pieces close at hand. The big thing is to make sure glue is not spilt onto the background fabric.
I take progress photos on my phone / camera so I can view my piece from a distance. This is important as sometimes you don't pick up a mistake when working close up to your piece.
I have hand appliqued the eye surround. Getting the colour right was important. I wanted to use a bright colour but it couldn't clash with the Iris.
The shadow of the eye surround has been fused on and secured with machine stitching. This wasn't in my orginal plan but I felt that the eye surround needed something else.
To create a shadow effect on the Iris, I have layered a shaped piece of black chiffon over the Iris and pupil then added a lighter piece of purple chiffon to the pupil to create a light effect.
To secure the rest of the Iris I have layered a large piece of black chiffon over the top and then stitched it to the outside of the Iris to secure it. Trimmed the excess.
The top is now layered onto batting and backing fabric to begin quilting. I have used various colours of thread to enhance the Iris colours.
I never plan my quilting in advance therefore I never know what the final appearance will be until I have quilted the different areas of the quilt.
Completed piece.
I will be designing a course later this year using the various techniques used in this blog so start collecting all your tiny scraps - nothing is to small. Grab off cuts from your friends when they are trimming their blocks. Separate them into colour bags. This will become your colour pallet.
Its loads of fun and can be made by any level of quilting experience.
Shirls


Thanks a lot! you are an artist!I love this eye! Wonderful,amazing!
ReplyDeleteThis quilt is so wonderful our twelve year old decided to use it as her inspiration for a chalk exhibit and contest - and she won 3rd place overall with it. It won best Visual Concept as well, thanks to your inspiration! Let me know if you'd like to see some photos of her chalk art eye - you can find me at dentalbuzz.com and there's an email there to get in touch.
ReplyDeleteTrish
Hi, I've just noticed your message. Any chance you still have those photos? Would love to see them.
DeleteBeautiful and creative quilt. I've been wondering what to do with these baskets of tiny snippets and you've given me inspiration. I especially appreciate your step by step photos and detailed explanations. Thank you for taking the time to walk us through your process. BTW, I love your site name, "Don't Wait to Create". Sincerely, Diane
ReplyDeleteGlad to inspire you. Would love to see the result of your next work. Shils
Delete